Rating of the best profilers in 2025
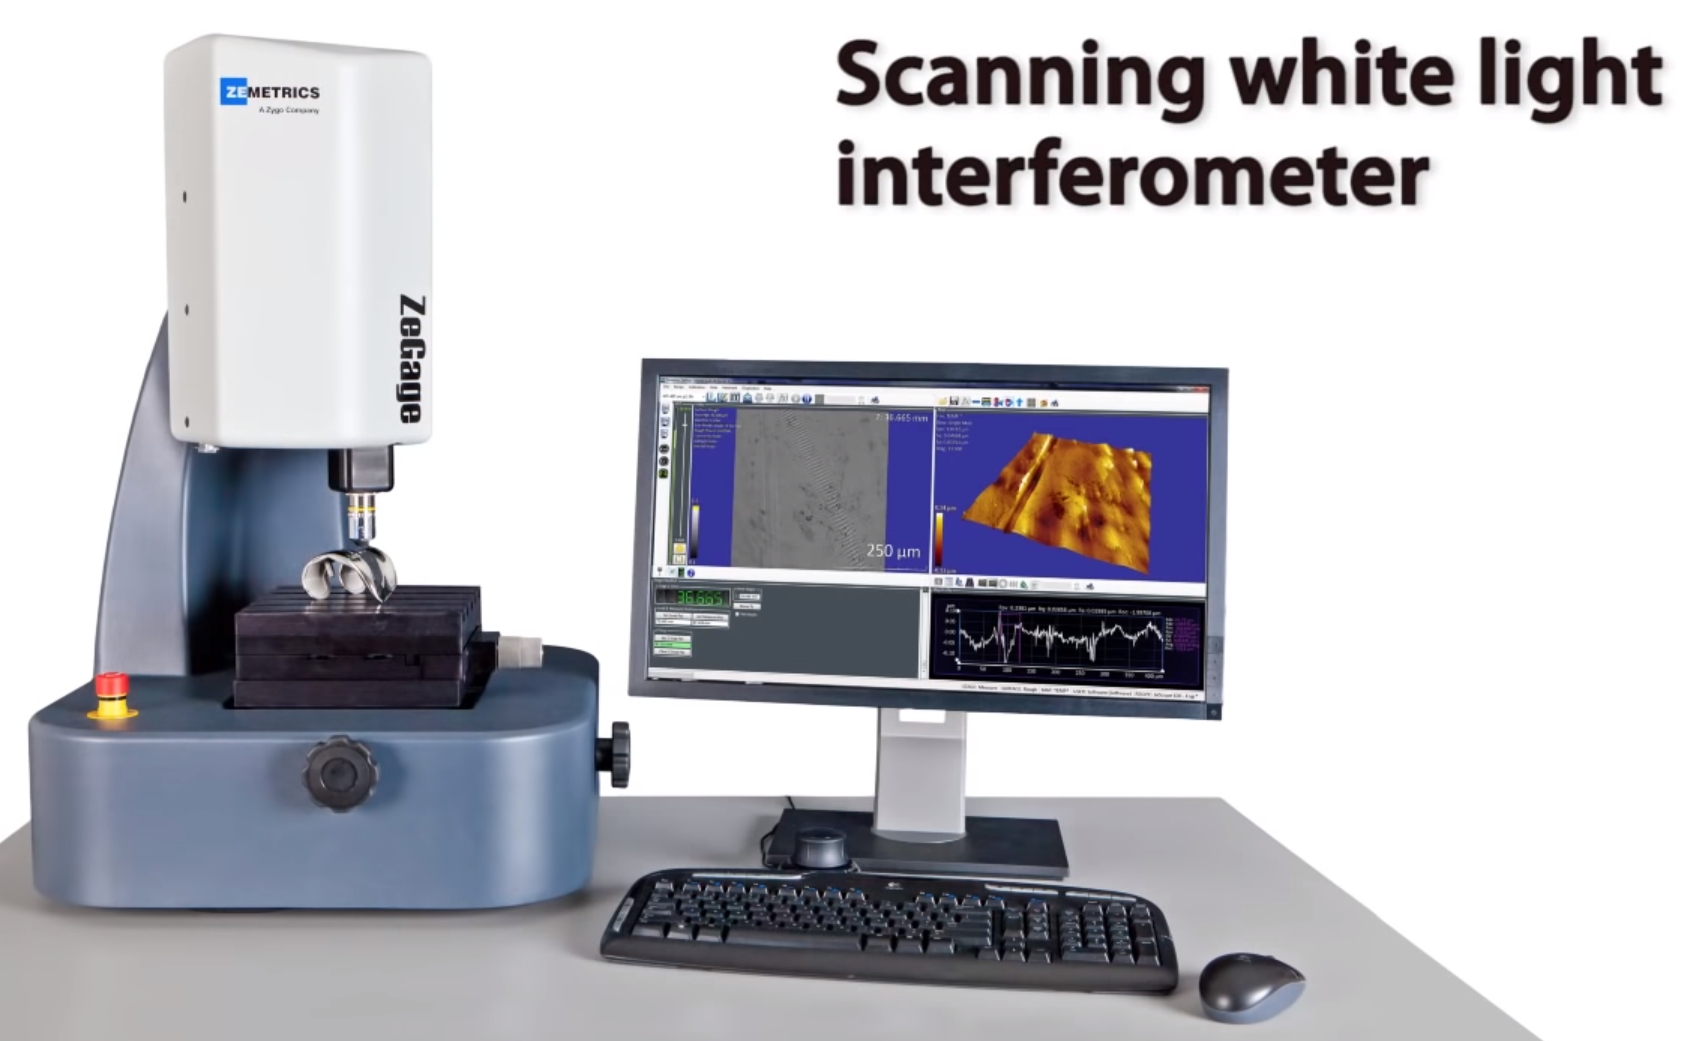
Roughness meters, also called profilometers, are instruments that measure the surface smoothness of an object. The main types of testers perform calculations using probes or lasers.
In our review, we will provide recommendations: what to look for in order not to make a mistake when choosing a product, which company model is better to buy. We will get acquainted with popular manufacturers, a description of their equipment, and orient you at an average price.
Content [Hide]
Types of testers
Obtaining data on the degree of roughness of any surface, calculating the coefficient of curvature - these are the tasks of mechanical engineers, allowing you to create accurate simulation models.An object that appears smooth to the human eye may not be so ideal to a trained technician. The ability to determine the frictional stress that occurs between two bodies allows you to accurately predict the life cycle of a particular component. Profilers are used to determine surface roughness inside braking systems while ensuring maximum vehicle safety.
Surface roughness is classified according to the ISO 4287 standard from "N12" to "N1", their measurement starts with a maximum height difference between microscopic slopes, peaks and troughs from 50 µm to 25 nm. The ability to detect object irregularities is of key importance for engineers who design high-precision systems and want to predict their performance, expected life cycle:
- determination of the rigidity that occurs between two contacting bodies;
- friction stress calculation;
- prediction of the risk of vibrations between connected parts;
- based on the detected unevenness, the right tool is selected for processing workpieces and other objects;
- it is possible to determine whether the lubricated element is rough enough to hold the oil molecules.
- predict the operation of the components of the brake system;
- measure the thickness of the film or coating material;
- determine the level of reflectivity of the surface;
- calculate the accuracy and performance of "FDM" units or CNC tools;
- predict the life cycle, maximum efficiency limits of a component based on detected cracks or irregularities.
Let's analyze the functionality of effective tester models, the popularity of which is the highest on the market:
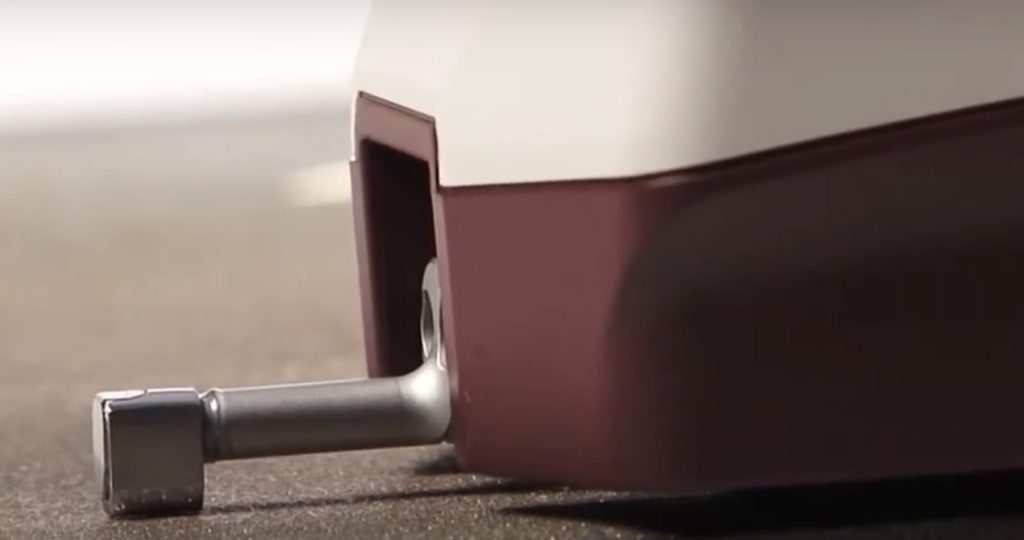
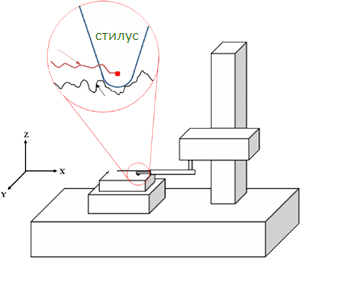
- The first instruments with diamond styluses are the P 6 Stylus from KLA and Tencor. These are original products that were first introduced in the 1940s and operate similarly to an LP player. The probe, which consists of a stylus, is held in place by a feedback mechanism and moves over the surface being monitored, while a lever connected to the probe follows the motion perpendicular to help generate the profile waveform. Probes are of several types:
a. mechanical;
b. inductive;
c. capacitive;
d. piezoelectric;
e. mechanical skate.
Since the signal is determined by the analog movement of the diamond stylus, its size, radius, clamping force, sensor speed are the determining factors for the accuracy and resolution of the equipment. Diamond tip profilometers are preferred for applications where 10-20nm roughness calculation is required and where the surface is not clean enough, so contact methods are more efficient as surface reflectance and coloration can fool other (optical) devices. The disadvantage of diamond stylus equipment is that it cannot be used on soft objects due to the formation of scratches on them.
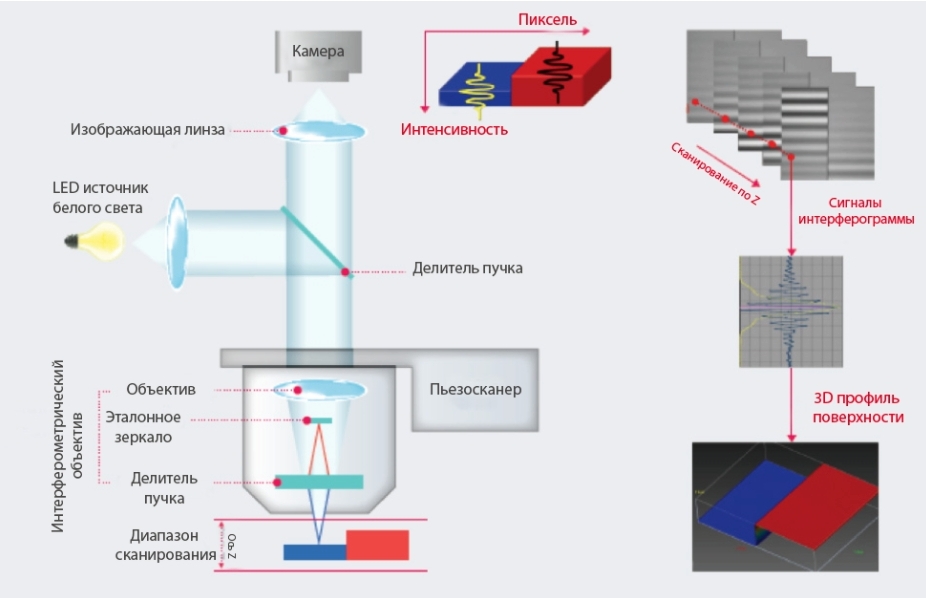
- Digital holographic microscopes (with time resolution) are optical testers, they determine the surface roughness using confocal chromatic aberration, laser triangulation, coherent interferometry, structural light scanning, optical difference, dividing prism, reference mirror and other methods. Although these devices are not as good as diamond models with a stylus, they are very accurate down to the micrometer.Their advantages are that they give results very quickly, do not contact the object, so the probe cannot damage or scratch it. With their help, the irregularities of soft materials, such as polymers, gels and others, are calculated.
- A fiber tester is a device in which the detection sensor and the data analyzer are located at a distance from each other, but connected by an optical fiber. The use of a cable improves signal quality, so the engineer can measure the roughness of objects located in places that are inaccessible for any reason. For example, inside radioactive chambers, cryogenic installations, toxic gas tanks that are not intended for maintenance for a long time.
Some machines make calculations for the irregularities of flat, curved surfaces. Recently, testers have appeared that produce a three-dimensional image based on the received data, capable of doing 3D rendering. Such computing is used by both the industrial sector and the scientific community, ensuring the success of critical research projects, fundamental industries and process control. 3D surface measurements (S-parameters) were defined in 1991 by participants in the first EC workshop and have since been developed according to ISO standards to supplement traditional 2D (two-dimensional) metrological R-parameters.
Testers are used to check the wear of metals, paintwork. As more and more electronic components are produced using thin film processing technology, some roughness meters have begun to make calculations with great precision, down to nanometers.
Probes typically use a tip with a radius of 2 µm. However, for precision products (a group of alloys with specified physical and mechanical properties), a probe with a tip in the range from 0.1 to 0.5 µm is often used. Depending on the probe used, measurement errors may occur, so it is important to check in advance if a particular tip is suitable. It is important to say a few words about how to choose the right measurement algorithm:
- Using a contact-type apparatus, irregularities are found by contacting the probe with the surface. In contrast, a laser-based sensor emits a beam of light on the object under study and, due to its wave properties, performs the necessary manipulations.
- Proper technique is the key to achieving a successful outcome. For example, a ground metal part is usually measured perpendicular to the machining direction so that the tester can better capture the characteristics of the object.
- Speed is also a key element of accurate computing. At first they are performed slowly, then the intensity increases until significant fluctuations from the set values begin. It is important to note that periodic calibration of the equipment is required to obtain quality indicators.
There are many other areas of scientific research and industrial control that can profit from the use of an optical profiler. Devices with low spatial resolution but large field of view can be used to measure areas.
All devices consist of at least two parts. The detector determines where the test points are on the sample, and the stage holds the object.In some systems, only one of the parts moves during calculations, in others both.
Where could I buy? Budget novelties are purchased in specialized markets. Managers will tell you the points you are interested in: how much the required model costs, what they are. The product can be viewed in the online store by ordering online.
Rating of quality profilers for 2025
Our list is based on real reviews, it takes into account the opinion of buyers familiar with the product, its functions. Here you will find comparison tables.
Contact
TMR 360
votes 0
This portable instrument is a new product. It uses the most common processor chips, high technology. The product has a 2.7-inch OLED screen, Bluetooth, SD card, wireless remote measurement control, MICRO-USB port, which greatly improves the quality of the instrument. The TMR 360 is suitable for both on-site and mobile measurement applications. The unit is easy to operate, capable of performing complex functions, calculates quickly and accurately, is convenient to carry, and meets international standards. This product has several optional accessories, connects to PC and Bluetooth wireless printer.
To measure the roughness of a part, place the probe on the surface of the workpiece, then run the tester. Precision software controls the probe. It moves at a uniform linear speed across the object, changing the amount of inductance of the sensor coil, which generates the output analog signal of the detector's sensitivity phase, in proportion to the surface roughness. This signal is amplified, converted, and then transferred to a PC.The collected parameters are filtered, calculated through the ARM chip, displayed on the OLED, they can be printed. This tester is capable of performing advanced mathematical analysis using the software.
Technical indicators:
| Options | Characteristics |
|---|---|
| Measured roughness parameters | Ra, Rz, Ry, Rq, Rt, Rp, Rv, R3z, Rmax, RSk, RSm, Rmr |
| measurement range | Ra, Rq: 0.005-16 µm, Rz, R3z, Ry, Rt, Rp, Rm: 0.02-160 µm, Sk: 0-100%, S, Sm: 1 mm, tp: 0-100% |
| Permission | 0.01 µm |
| Max evaluation length | 19 mm / 0.748 inch |
| Reference length / Measuring range (automatic) | 0.25mm, 0.8mm, 2.5mm / ±20μm, ±40μm, ±80μm, |
| Estimation Length | 0.25; 0.8; 2.5 mm option, 1L-5L |
| Compliance | ISO, DIN, ANSI, JIS, FCC, CE |
| Filtering methods | RC, PC-RC, GAUSS, D-P, |
| Permissible basic error | ≤ ± 10 % |
| Repeatability (scatter) of measurement results | <6% |
| Sensor type | piezocrystal |
| The radius of the tip of the needle of the diamond gauge | 5 µm |
| Power type | Rechargeable lithium-ion battery |
| Working temperature | 0 °C...+40 °C |
| The weight | 440 g |
| Dimensions | 119×47×65mm |
- clear interface;
- OLED screen;
- portable;
- MICRO-USB port;
- bluetooth;
- SD card;
- wireless remote control.
- high price.
IShP-6100
votes 0
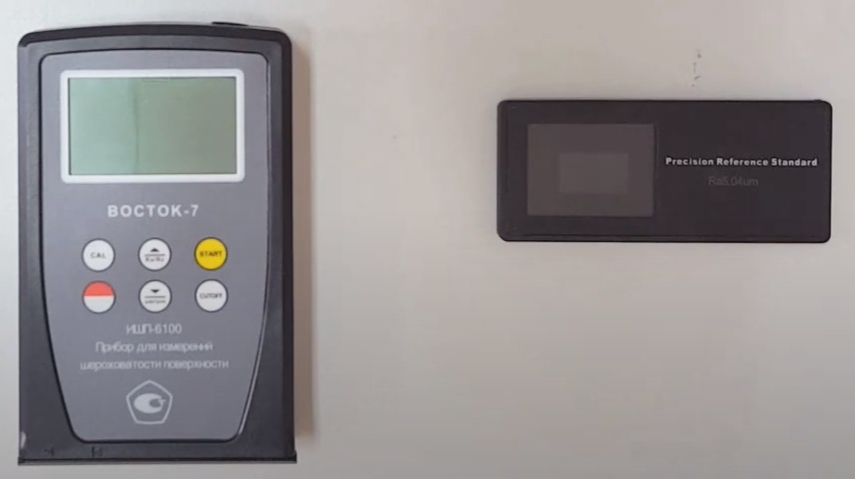
"IShP" - a device from a domestic manufacturer, calculates the degree of unevenness of products. Details can be cylindrical or flat, with holes, the device can easily cope with the measurement of complex, intricate objects with grooves and recesses. The tester is used to evaluate the quality of surfaces, metals and other materials.The functioning of the product is based on the work of a diamond probe, which converts its vibrations into changes in electrical voltage, the brain of the equipment is a microprocessor that controls all actions.
Before starting measurements, it is necessary to install the device on the object being measured. The needle located at the bottom of the tester moves evenly over the surface. The calculation results are displayed on the screen. The profilometer complies with ISO, DIN, ANSI and JIS regulations and is often used during manufacturing processes to determine and control the unevenness of machined parts. All calculations in accordance with the selected conditions are recorded and displayed on a PC. The equipment is produced in 3 modifications "IShP-6100", "IShP-210" and "IShP-110", they differ in technical and metrological parameters.
Technical indicators:
| Options | Characteristics |
|---|---|
| Automatic shutdown of the device, min. | 5 |
| Food | 4 x 1.5 V batteries or accumulators type AA |
| Duration of continuous operation, h | ≥10 |
| Overall dimensions (length × width × height), mm, no more | 80×30×128 |
| Weight, g, no more | 280 |
| Operating conditions: | |
| Ambient temperature, °С | 0…+50 |
| Relative humidity, % | 30…80 |
| Service life, years | 5 |
- powerful processor;
- ease of use;
- complies with ISO, DIN, ANSI and JIS regulations.
- not detected.
TMR100
votes 0
Your attention is a digital portable unit "TMR 100", it is able to instantly and accurately measure the roughness of an object down to a micron. The main advantage of the product is its affordable price compared to its competitors. The dimensions of the device allow you to comfortably carry out calculations with one hand.A special drive coupled with a 30° sensitive stylus helps make measurements that will meet ASTM 3894.5-2002. The accuracy of the calculations made by the TMR 100 is not inferior to the performance of the best electronic devices with diamond probes.
The equipment is capable of measuring the depth of cracks, chips on the outer or inner surfaces of metal objects, pipe products, concrete elements, this provides an opportunity to control the quality and current state of certain structures. It is important to note that "TMR 100" is able not only to perform its direct duties of calculating the degree of roughness of objects, but also to measure the thickness of the coating.
Technical indicators:
| Options | Characteristics |
|---|---|
| Measurement range, mm | 0...5,0 |
| Resolution (scale resolution), µm | 1 |
| Accuracy, µm | ±2 |
| Temperature regime: | |
| exploitation | 0...+40 |
| storage | -10...+60 |
| Humidity of the environment, no more | 80% |
| Powered by battery type RS44 (1 pc) | 1.5V |
| Gross dimensions (in case), cm | 40*30*20 |
| Weight, kg | 1,5 |
- determination of a zero indicator at any point;
- displays data in meters and inches with reverse conversion;
- a tungsten carbide needle is capable of making up to 20 thousand measurements;
- memory allows you to store a large amount of data;
- finding the maximum, minimum deviations, tolerance and absolute indicators;
- data transmission to a computer via cable;
- used as a mechanical coating thickness gauge;
- price-quality ratio.
- not detected.
TR110
votes 0
"TR100" is used to measure the unevenness of flat, inclined surfaces of cylindrical shapes.The equipment is attached to the object, after which the probe integrated into the lower part of the apparatus, moving evenly over the surface, performs calculations. The indicators are displayed on the LCD screen. Improved model "TR110" differs from "TR100" in an improved design, a large display with LED backlight
The accuracy of the device is achieved thanks to a diamond needle, the vibrations of which lead to a change in voltage in proportion to these movements. Roughness calculations are printed out to a printer or transferred to a PC for subsequent calculations. Depending on the model range, the devices are equipped with a probe with an angle of 90 degrees and a radius of 2, 5 or 10 micrometers, while the force on the object under test can be 0.75, 4 or 16 mN, respectively. It is important to note that the equipment is equipped with a special table, which greatly simplifies the work.
Technical indicators:
| Options | Characteristics |
|---|---|
| Measured roughness parameters | Ra and Rz |
| Measurement range by parameter Ra, µm | from 0.05 to 10 |
| Range of indications for parameter Rz, µm | from 1 to 50 |
| Pitch cutoff, λs, mm | 0,25; 0,8; 2,5 |
| The largest length of the measurement section, mm | 6 |
| Estimation length, mm | 1,25; 4,0; 5,0 |
| Number of base lengths in the evaluation length | 5 or 2 (for λc=2.5) |
| Static measuring force, no more than, N | 0.016 |
| Static measuring force, no more than, N | 0.016 |
| Probe curvature radius, µm | 10,0±2,5 |
| Angle of sharpening shupa, … ° | 90 (+5 , -10) |
| Limit of permissible basic relative error of the instrument by parameter Ra, % | 15 |
| Sensor type | Piezoelectric |
| Speed, mm/s | 1 |
| Overall dimensions TR100, mm: | |
| length | 110 |
| width | 70 |
| height | 24 |
| Weight, no more than, kg | 0.2 |
- small dimensions, affordable price;
- significant range of calculations;
- able to examine most materials;
- works in accordance with Ra, Rz standards;
- external calibration;
- meets the requirements of ISO, DIN (German Standards Institute) regulations.
- not detected.
SJ-210
votes 0
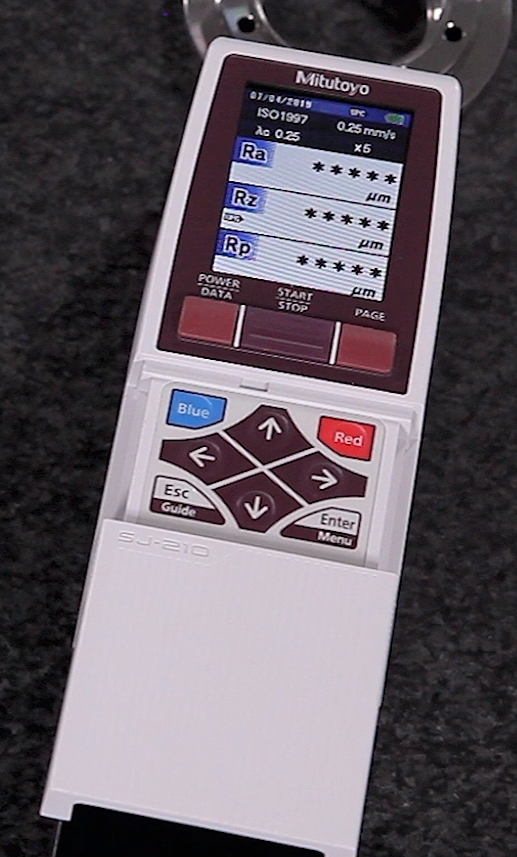
"SJ-210" is equipped with a transducer, probe, high-speed processor. Roughness calculations are performed as standard for devices with a diamond needle. The probe moves uniformly, examining the object, causing a proportional change in voltage. Then the signal is transformed thanks to the microprocessor and goes to the LCD screen. The measurement results are displayed in the form of graphs of deviations from the specified parameters. The readings can be transferred via the USB port to a PC for further work.
"SJ-210" has the ability to store readings of 10 thousand calculations on an SD card. The device is completed with the built-in printer and the touch screen. The equipment operates from an AC outlet through a built-in rectifier or from a battery, this makes the device portable, allowing it to be used away from the mains.
Technical indicators:
| Options | Characteristics |
|---|---|
| Measured roughness parameters | Ra, Ry, Rz, Rt, Rp, Rq, Rv, Sm, S, Pc, mr(c), dc, Rpk, Rvk, Rk, Mr1, Mr2, Lo, R, AR, Rx, A1, A2, Vo |
| Analyzed curves | - |
| Measuring range / Resolution, µm | 360/0.02 (-200 to +160); 100/0.006 (-50 to +50); 25/0.002 (-12.5 to +12.5). |
| Magnification, X: | |
| vertical | 10 - 10,000 (automatic) |
| horizontal | 1 - 1000 (automatic) |
| Pitch cutoff | 0,08; 0,25; 0,8; 2,5 |
| λc, mm | 2,5; 8 |
| Estimation length, mm | Min. 0.08, max. 16.0 |
| Sensor displacement, mm | 17.5 or 5.6 |
| Deviation from flatness of independent support, µm | - |
| Measuring force, mN | 0.75 |
| Number of base lengths per estimate length | From 1 to 10 (from 0.08 to 16 mm, through 0.01 mm). |
| Probe radius, µm | 2 or 5 (60º/90º); 2RC75%, 2RC-PC |
| Filter type | Gaussian filter |
| Limit of permissible basic systematic error, % | 5 |
| Overall dimensions, mm | 160*62,8*52,1 |
| Food | Built-in AC adapter or rechargeable Ni-MH battery |
| Weight, kg | 0.3 |
| Processor unit, kg | 0.2 |
| Operating temperature range, С | from 5 to 35 |
- works from the accumulator and the socket;
- SD card for storing up to 10,000 calculations;
- Touchpad;
- low price.
- not detected.
MarSurf PS 10
votes 0
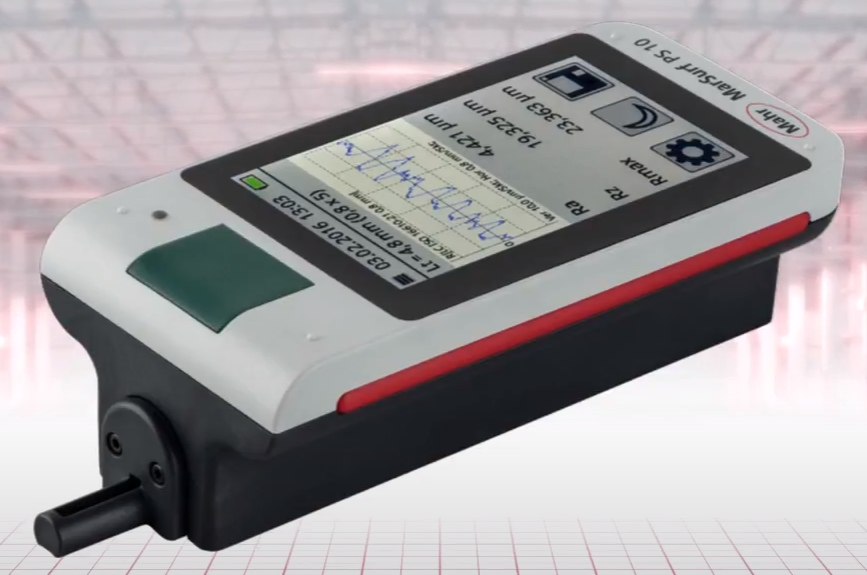
Your attention - a portable device, it can be used away from the mains. The limit of calculations that the device is capable of is 350 µm (from -200 to 150). The built-in probe does not require debugging, it takes measurements at any angle in accordance with the Rz scale. The maximum traverse of the product is 17.5 mm. The device is easy to operate and conforms to DIN EN ISO 3274 standards. The ergonomic keys of the PHT series have an open slider that largely prevents the accumulation of dirt and oil. Adjusting the height of the stylus allows calculations to be made at different levels.
Thanks to its robust housing, the MarSurf PS 10 is insensitive to adverse operating conditions. The device has an ergonomic design, conveniently located controls and an easy-to-read touch screen. A suitable configuration, coupled with a small weight of the device (about 500 g), is suitable for mobile use. Comfort is added by a case with a belt for carrying equipment.
It should be noted the integrated high-capacity battery that can work without a network for a long time. "MarSurf PS 10" is able to function stationary if it is connected to a power outlet through a rectifier. All functions of the device are summarized in a logically structured menu, which is accessed via the touch screen.Device settings are locked and additionally protected against unauthorized changes using a code.
Technical indicators:
| Options | Characteristics |
|---|---|
| Measurement range of the roughness parameter Ra, µm | 0.02 to 10 |
| The range of indications of the roughness parameters Rz, | 0.1 to 50 |
| Probe travel range, µm | -200 to +170 |
| Limit of permissible basic relative error of measurements of the roughness parameter Ra, % | 5 |
| Probing track length, mm | 0,56; 1,5; 4,8; 16 |
| Measuring force, mN | 0.6 to 0.8 |
| Probe radius, µm | 2 (5)* |
| Filters | Phase corrected (Gaussian filter) ISO 11562 (GOST R8.562-2009), RS filter according to ISO 3274 (GOST 19300-86) |
| Pitch cutoff λс, mm | 0,08; 0,25; 0,8; 2,5 |
| Interfaces | USB-Device, MarConnect (RS232, USB), micro SD Slot for SD TM / SDHC-Cards up to 32 GB |
| The degree of protection of the shell in accordance with GOST 14254 | IP40 |
| Battery | Li-ion battery, 3.7 V, power 11.6 V∙A |
| Rated adapter supply voltage, V | 100 to 264 |
| Power supply frequency, Hz | 50/60 |
| Overall dimensions, no more than, mm: | |
| length | 160 |
| width | 77 |
| height | 50 |
| Weight no more than, kg | 0,5 |
| Operating conditions: | |
| Normal temperature range, ⁰С | +15 to +25 |
| Working range of temperature values, ⁰С | +5 to +40 |
| Relative air humidity, no more than, % | 85 non-condensing |
- intuitive operation;
- self-acting selection of the cutoff of the calculation step;
- the start key simultaneously serves as a button to return to the home page of the start menu;
- instant access to the main functions via the touch screen.
- not detected.
Optical
Surfiew Academy GLtech
votes 0
Optical tester "Surfiew Academy" determines the degree of unevenness of objects. The device scans both single points and lines, making a 3-dimensional rendering.The device reproduces the morphology of the details by measuring the height of the steps of the surface. The most important areas of use for Surfiew Academy are:
- parallel control of 2D and 3D configuration of objects;
- assessment of structure levels, linear analysis, circles, arcs, angles, measurements of dimensions;
- determination of roughness characteristics;
- Identification of defects: scratches, chips, cracks.
It is important to note the industry segments where the equipment is used:
- semiconductors;
- LCD/OLED screens
- basis of printed circuit boards;
- microoptics;
- MEMS designs;
- laser industry;
- production of inkjet printers, plotters.
Technical indicators:
| Options | Characteristics |
|---|---|
| Vertical resolution | VSI/VEI < 0.5 nm, VPI < 0.1 nm |
| Horizontal Resolution | 0.03 – 7.2 µm (depending on magnification and camera) |
| Height measurement repeatability | ≤ 0.3% at 1σ |
| Scan speed | 8 – 40 µm/sec |
| Scan method | Piezo based scanner, closed loop |
| Scan Range | ≤ 100 µm (piezo ≤ 250 µm optional) |
| Lens | One |
| Imaging lens | 1.0X |
| Camera | 1/2”, single color (2/3”, 1” optional) |
| Backlight | White LED |
| Filter | 2 (manual change) |
| Autofocus | — |
| Software Stitching | Not |
| Sample reflectance | 0.05 – 100% |
| Max sample weight | ≤ 2 kg |
| Stage movement range | 50 × 50 mm (manual) |
| Scanning head travel range | 20 mm (manual) |
| Table tilt | ± 2° (manual) |
| Joystick | — |
| Stage dimensions | 120 × 120mm |
| Vibration isolation | Passive type (vertical resonance at 2.5 Hz) |
| Total system weight | ≈ 10 kg |
| Supply voltage | 110 V / 220 V (± 10%), 15 A, 50/60 Hz |
| Software | Surface View / Surface Map (Windows 10 64-bit) |
- height error 0.1 nanometers;
- device resolution does not depend on the lens used;
- equipped with optics with different display angles;
- evaluates transparent, translucent, opaque objects;
- ease of calculations;
- Closed-loop piezo sensor guarantees measurement accuracy;
- Surfiew Academy tracks personal status;
- increased repetitiveness of reproducible calculations.
- not detected.
Nanosystems NV-1800
votes 0
"Nanosystems" is a non-contact, optical device used by quality control systems at various stages of microelectronics production. The equipment is used by R&D departments. The "NV" series includes three main types of profilometers, differing in the MAX dimensions of the samples with which it is possible to work.
The patented WSI/PSI system measures a huge number of objects. They can vary in material structure, characteristics, including 2D and 3D surface configurations, shapes, height levels (vertical 0.1 nm, lateral resolution 0.2 µm).
WSI (White Light Scanning Interferometry) is a technology that allows you to measure area, height and volume, and quickly and with a low error (0.1 nm). The Wsi NanoSystem is able to easily examine samples in just a couple of seconds from 0.1 nm to 10000 µm in height, while still evaluating the true shapes of 3D samples. The repetitiveness is 0.1% (1σ).
Technical indicators:
| Options | Characteristics |
|---|---|
| Measured method | White Light Scanning Interferometry (WSI) / Phase Shift Interferometry (PSI) |
| Interferometric lenses | Single lenses |
| Light | White LED |
| Scan method | PZT Scanning |
| Scan Range | max 270um |
| Scan speed | Greater than 12um/sec (lX™ 5X optional) |
| Incline | ±3° |
| Vertical resolution | WSI: greater than 0.5nm/ PSI: greater than 0.1nm |
| Lateral Resolution | 0.2~4um |
| Repeatability | more than 0.5% |
| X/Y movement | 50x50mm (manual) |
| Move Z | 30mm (manual) |
| autofocus | + |
| Ambient conditions | 20±20C, Rh: more than 60% |
| Software | NanoView, NanoMap |
| A computer | Window |
| lenses | 0.5x, 0.75x, lx, 1.5x, 2x (optional) |
| Interferometric lenses | 2.5x, 5x, lOx, 20x, 50x, lOOx (optional) |
| instrument table | 150x150mm |
- portable model;
- acceptable price;
- manual adjustment of the table (50x50 mm);
- movement along the Z axis (up-down) 30 mm;
- one lens.
- not detected.
MicroXAM-100
votes 0
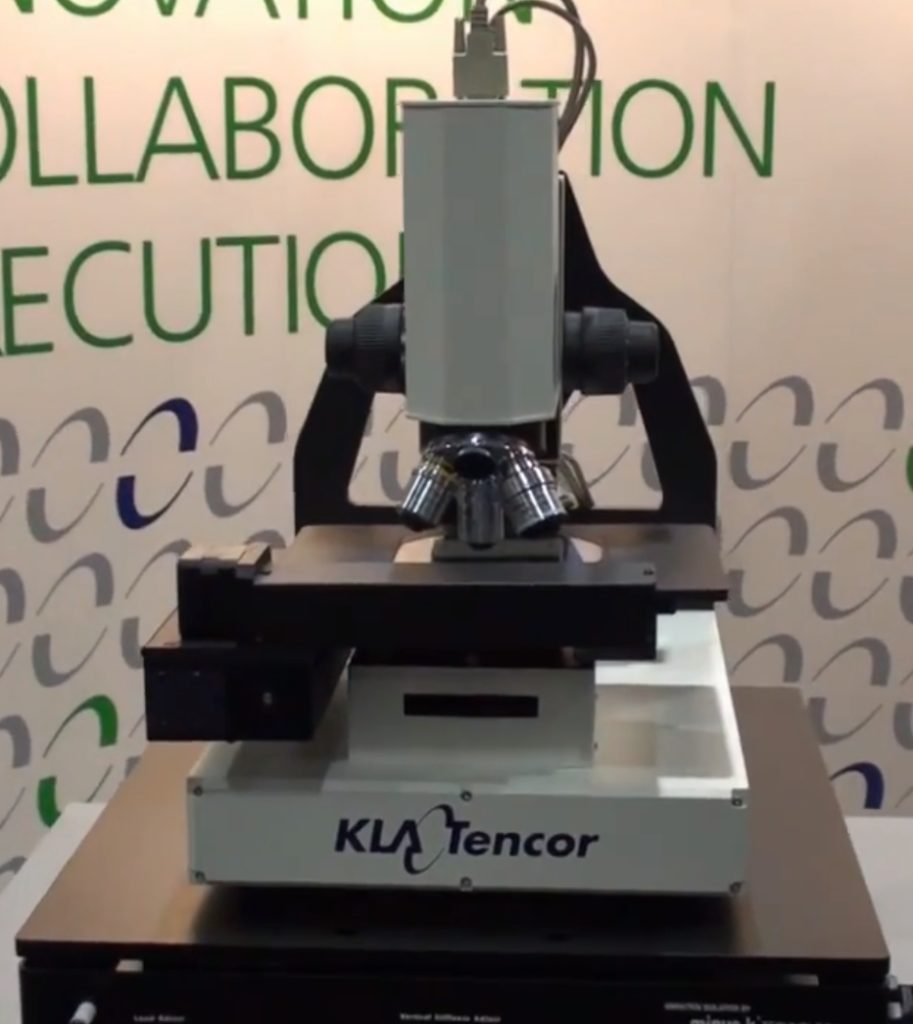
Product from a foreign manufacturer. It is designed for fast, accurate research, the design of the device does not have a large number of complex parts, and the operation is intuitive. "MicroXAM-100" integrates technologies of phase shift, interferometer and optical microscope. The equipment is capable of making non-contact 3D measurements of the unevenness of objects with a nanometer error.
Combining a large number of functions, the device gives the owner ample opportunities for evaluating objects, including obtaining a three-dimensional description. All indicators are of high quality, both for relatively smooth parts and for rough ones.
Technical indicators:
| Options | Characteristics |
|---|---|
| Reproducibility of vertical step measurement | 1 nm (1σ) |
| Measurement error | <0,1% |
| Vertical scanning range | 250 µm (10 mm optional) |
| Vertical scanning speed | Up to 7.2 µm/s |
| View area | 101x101 µm - 1.0x1.0 mm |
| Video camera resolution | 480x480 |
| Stage movement range | 100х100 mm |
| Stage tilt | ±6° |
| Vibration isolation | Passive |
| Lens magnification | 50x, 20x, 10x, 5x |
| Length | 406mm |
| Width | 304mm |
| Height | 431mm |
| Instrument weight | 22.7 kg |
| Shipping weight | 68.0 kg |
- 3D rendering, extracting the profile of a single scan line;
- assessment of roughness, irregularities, material thickness, chips, cracks, and other geometric parameters;
- simple, intuitive control due to the presence of a video camera;
- transfer of calculations without stopping the research process;
- possibility of mathematical analysis of SPIP data;
- scanning table included (from 100X100 µm to 1000X1000 mm)
- not detected.
Swift PRO Duo
votes 0
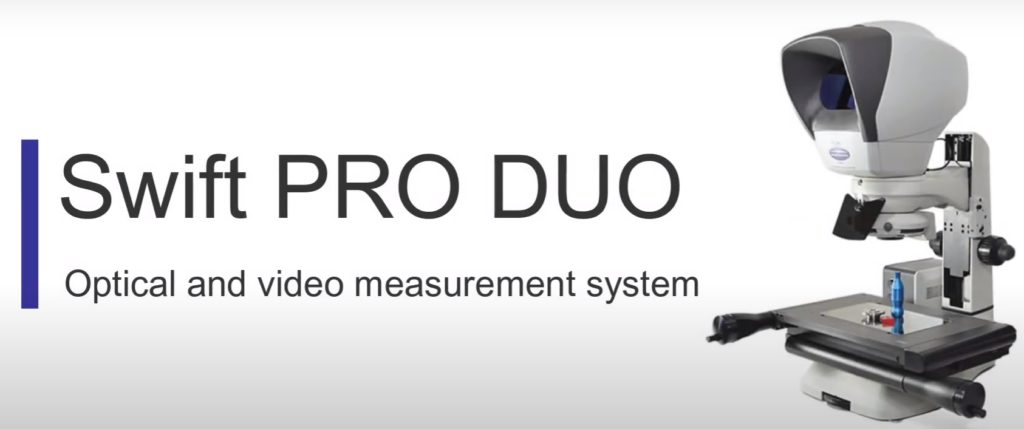
Swift PRO is a range of powerful, easy-to-use non-contact measuring systems. The equipment combines the latest technology of optical video measurements. It is the right tool for a wide range of applications, from electronics and aerospace to plastics and medical parts where quality control is required. With its design, fast, accurate 3-axis measurements, and user-friendly interface, Swift PRO provides operators with a fast, easy way to report.
Basicly simple, the system can be used by workers or engineers who require minimal training. This significantly reduces personnel costs, the number of operator errors. Multifunctional software "Swift PRO" is easy to learn, use, it provides instant profile data, advanced reporting, guarantees system management.
Previously difficult-to-view specimens can be examined better with a new HD camera with Video Edge Detection (VED) and adjustable stage lighting.Measurement accuracy up to 5 µm is provided by the QC3000 microprocessor and PC software, "Swift PRO" is small in size.
Technical indicators:
| Options | Characteristics |
|---|---|
| Technology | Optical, video |
| Functions | Shape, thickness measurements |
| Place of application | Laboratories, production lines |
| Configuration | desktop |
| Other characteristics | Contactless, automatic |
- small dimensions;
- powerful processor;
- video camera with Video Edge Detection function;
- multifunctional software;
- contactless systems.
- not detected.
We hope these tips will help you make your choice. A profilometer is a fairly complex device, so it is necessary to consult with a specialist before making a final choice.
new entries
Categories
Useful
Popular Articles
-

Top ranking of the best and cheapest scooters up to 50cc in 2025
Views: 131649 -

Rating of the best soundproofing materials for an apartment in 2025
Views: 127688 -

Rating of cheap analogues of expensive medicines for flu and colds for 2025
Views: 124517 -
The best men's sneakers in 2025
Views: 124030 -

The Best Complex Vitamins in 2025
Views: 121937 -
Top ranking of the best smartwatches 2025 - price-quality ratio
Views: 114978 -

The best paint for gray hair - top rating 2025
Views: 113393 -
Ranking of the best wood paints for interior work in 2025
Views: 110318 -
Rating of the best spinning reels in 2025
Views: 105327 -

Ranking of the best sex dolls for men for 2025
Views: 104363 -
Ranking of the best action cameras from China in 2025
Views: 102214 -
The most effective calcium preparations for adults and children in 2025
Views: 102010
